Building a Modern Video Streaming Service with Spring Boot, FFmpeg, and ZLMediaKit
Introduction
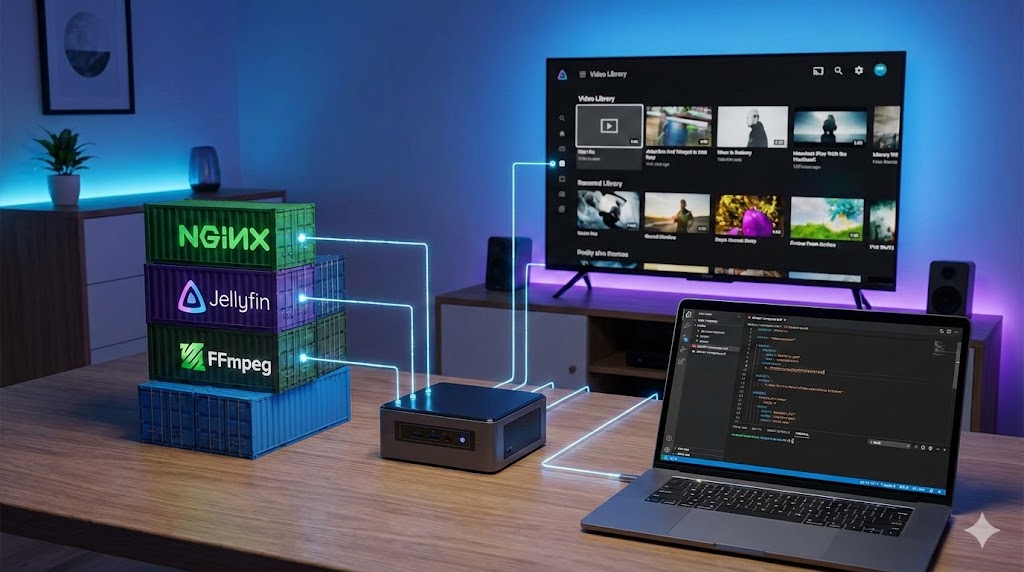
In this article, we’ll build a complete local video streaming service from scratch using modern technologies. Unlike traditional approaches that require local FFmpeg installation, we’ll leverage Docker containers for a cleaner, more portable solution.
What we’ll build:
- RESTful API for stream control
- Docker-based FFmpeg transcoding
- Real-time RTMP to HTTP-FLV streaming
- Beautiful web interface with flv.js player
Tech Stack:
- Java 21
- Spring Boot 4.0 (latest with modular architecture)
- FFmpeg (Docker)
- ZLMediaKit (Docker)
- flv.js 1.6
Architecture Overview
Our streaming service follows a simple but powerful architecture:
User Browser (flv.js)
    ↓ HTTP Request
Spring Boot API
    ↓ Spawns Docker Container
FFmpeg Container
    ↓ RTMP Push
ZLMediaKit Server
    ↓ HTTP-FLV Stream
User Browser (Video Playback)
How It Works
- User initiates stream via web interface
- Spring Boot validates the video file and spawns an FFmpeg Docker container
- FFmpeg reads the video file and pushes RTMP stream to ZLMediaKit
- ZLMediaKit converts RTMP to HTTP-FLV/HLS for browser consumption
- Browser plays the stream using flv.js
Part 1: Environment Setup
Prerequisites
Before we begin, ensure you have:
- Java 21 or later
- Maven 3.8+
- Docker Desktop
Step 1: Start ZLMediaKit
ZLMediaKit is our media server that handles RTMP input and provides HTTP-FLV/HLS output.
docker run -d \
  -p 1935:1935 \
  -p 8099:80 \
  -p 8554:554 \
  -p 10000:10000/udp \
  --name zlmediakit \
  zlmediakit/zlmediakit:master
Port Mapping:
-
1935- RTMP input -
8099- HTTP-FLV/HLS output -
8554- RTSP (optional) -
10000- WebRTC (optional)
Step 2: Pull FFmpeg Docker Image
Instead of installing FFmpeg locally, we’ll use a Docker image:
docker pull jrottenberg/ffmpeg:4.4-ubuntu
Step 3: Prepare Test Video
Create a directory for videos and download a test file:
mkdir -p ~/Videos
curl -o ~/Videos/test.mp4 \
  http://commondatastorage.googleapis.com/gtv-videos-bucket/sample/BigBuckBunny.mp4
Part 2: Spring Boot Backend
Project Structure
spring-ffmpeg/
├── src/main/java/com/example/springffmpeg/
│   ├── SpringFfmpegApplication.java
│   ├── config/
│   │   └── StreamConfig.java
│   ├── controller/
│   │   └── StreamController.java
│   └── service/
│       └── StreamService.java
├── src/main/resources/
│   ├── application.yml
│   └── static/
│       └── index.html
└── pom.xml
Maven Dependencies
Add these dependencies to pom.xml:
<parent>
    <groupId>org.springframework.boot</groupId>
    <artifactId>spring-boot-starter-parent</artifactId>
    <version>4.0.0</version>
</parent>

<dependencies>
    <!-- Spring Boot 4.0 uses modular starters -->
    <dependency>
        <groupId>org.springframework.boot</groupId>
        <artifactId>spring-boot-starter-webmvc</artifactId>
    </dependency>

    <dependency>
        <groupId>org.apache.commons</groupId>
        <artifactId>commons-exec</artifactId>
        <version>1.4.0</version>
    </dependency>

    <!-- Spring Boot 4.0 requires explicit test starter -->
    <dependency>
        <groupId>org.springframework.boot</groupId>
        <artifactId>spring-boot-starter-webmvc-test</artifactId>
        <scope>test</scope>
    </dependency>
</dependencies>
Spring Boot 4.0 Changes:
- Replaced
spring-boot-starter-webwithspring-boot-starter-webmvc(new modular design) - Added
spring-boot-starter-webmvc-testfor testing - Based on Jakarta EE 11 and Spring Framework 7.x
Configuration Class
Create StreamConfig.java to manage application settings:
@Component
@ConfigurationProperties(prefix = "stream")
public class StreamConfig {
    private String zlmHost;
    private Integer rtmpPort;
    private Integer httpPort;
    private String ffmpegImage;
    private String videoPath;
    private String dockerVideoMount;

    // Getters and setters...
}
Application Configuration
Configure application.yml:
server:
  port: 8080

stream:
  zlm-host: localhost
  rtmp-port: 1935
  http-port: 8099
  ffmpeg-image: jrottenberg/ffmpeg:4.4-ubuntu
  video-path: /Users/cui/Videos/
  docker-video-mount: /videos

spring:
  web:
    multipart:
      max-file-size: 1GB
      max-request-size: 1GB
Spring Boot 4.0 Configuration Changes:
- Multipart configuration
spring.web.multipart - Better alignment with Spring Framework 7.x structure
Stream Service
The core logic resides in StreamService.java:
@Service
public class StreamService {

    @Autowired
    private StreamConfig streamConfig;

    private final Map<String, DefaultExecutor> streamProcesses = new ConcurrentHashMap<>();

    public boolean startStream(String videoFilename, String streamKey) {
        // Validate video file
        File videoFile = new File(streamConfig.getVideoPath() + videoFilename);
        if (!videoFile.exists()) {
            log.error("Video file not found: {}", videoFilename);
            return false;
        }

        // Build Docker command
        CommandLine cmdLine = buildFFmpegCommand(videoFilename, streamKey);

        // Execute asynchronously
        DefaultExecutor executor = new DefaultExecutor();
        executor.setWatchdog(new ExecuteWatchdog(ExecuteWatchdog.INFINITE_TIMEOUT));

        executor.execute(cmdLine, new ExecuteResultHandler() {
            @Override
            public void onProcessComplete(int exitValue) {
                log.info("Stream completed: {}", streamKey);
                streamProcesses.remove(streamKey);
            }

            @Override
            public void onProcessFailed(ExecuteException e) {
                log.error("Stream failed: {}", streamKey, e);
                streamProcesses.remove(streamKey);
            }
        });

        streamProcesses.put(streamKey, executor);
        return true;
    }

    private CommandLine buildFFmpegCommand(String videoFilename, String streamKey) {
        CommandLine cmd = new CommandLine("docker");
        cmd.addArgument("run");
        cmd.addArgument("--rm");
        cmd.addArgument("-v");
        cmd.addArgument(streamConfig.getVideoPath() + ":" + streamConfig.getDockerVideoMount());
        cmd.addArgument(streamConfig.getFfmpegImage());

        // FFmpeg arguments
        cmd.addArgument("-re");  // Read at native framerate
        cmd.addArgument("-i");
        cmd.addArgument(streamConfig.getDockerVideoMount() + "/" + videoFilename);
        cmd.addArgument("-c:v");
        cmd.addArgument("libx264");
        cmd.addArgument("-preset");
        cmd.addArgument("ultrafast");
        cmd.addArgument("-tune");
        cmd.addArgument("zerolatency");
        cmd.addArgument("-c:a");
        cmd.addArgument("aac");
        cmd.addArgument("-f");
        cmd.addArgument("flv");

        // RTMP URL (use host.docker.internal for Mac/Windows)
        String rtmpUrl = String.format("rtmp://host.docker.internal:%d/live/%s",
            streamConfig.getRtmpPort(), streamKey);
        cmd.addArgument(rtmpUrl);

        return cmd;
    }
}
REST Controller
Create StreamController.java for API endpoints:
@RestController
@RequestMapping("/api/stream")
@CrossOrigin(origins = "*")
public class StreamController {

    @Autowired
    private StreamService streamService;

    @PostMapping("/start")
    public ResponseEntity<?> startStream(@RequestBody StreamRequest request) {
        boolean success = streamService.startStream(
            request.getVideoFilename(),
            request.getStreamKey()
        );

        if (success) {
            Map<String, String> response = new HashMap<>();
            response.put("message", "Stream started");
            response.put("flvUrl", streamService.getPlayUrl(request.getStreamKey(), "flv"));
            return ResponseEntity.ok(response);
        }

        return ResponseEntity.badRequest().body("Failed to start stream");
    }

    @PostMapping("/stop")
    public ResponseEntity<?> stopStream(@RequestBody StreamRequest request) {
        boolean success = streamService.stopStream(request.getStreamKey());
        return success ? ResponseEntity.ok("Stream stopped")
                       : ResponseEntity.badRequest().body("Stream not found");
    }
}
Part 3: Frontend with flv.js
Modern UI Design
Create index.html with a beautiful, modern interface:
<!DOCTYPE html>
<html lang="en">
<head>
    <meta charset="UTF-8">
    <title>StreamFlow - Local Video Streaming</title>
    <link href="https://fonts.googleapis.com/css2?family=Outfit:wght@300;400;600&display=swap" rel="stylesheet">
    <style>
        :root {
            --primary: #6366f1;
            --bg: #0f172a;
            --surface: #1e293b;
            --text: #f8fafc;
        }

        body {
            font-family: 'Outfit', sans-serif;
            background-color: var(--bg);
            color: var(--text);
        }

        h1 {
            background: linear-gradient(135deg, #818cf8 0%, #c084fc 100%);
            -webkit-background-clip: text;
            -webkit-text-fill-color: transparent;
        }

        video {
            width: 100%;
            border-radius: 8px;
            background: #000;
        }
    </style>
</head>
<body>
    <div class="container">
        <h1>StreamFlow</h1>
        <video id="videoElement" controls></video>

        <input type="text" id="videoFilename" placeholder="Video filename" value="test.mp4">
        <input type="text" id="streamKey" placeholder="Stream key" value="mystream">

        <button id="startBtn">Start Stream</button>
        <button id="stopBtn" disabled>Stop Stream</button>

        <div id="status">Ready to stream</div>
    </div>

    <script src="https://cdn.jsdelivr.net/npm/flv.js@1.6.2/dist/flv.min.js"></script>
    <script>
        let flvPlayer = null;

        document.getElementById('startBtn').addEventListener('click', async () => {
            const response = await fetch('/api/stream/start', {
                method: 'POST',
                headers: { 'Content-Type': 'application/json' },
                body: JSON.stringify({
                    videoFilename: document.getElementById('videoFilename').value,
                    streamKey: document.getElementById('streamKey').value
                })
            });

            const data = await response.json();

            // Wait for stream to initialize
            await new Promise(resolve => setTimeout(resolve, 5000));

            // Initialize flv.js player
            if (flvjs.isSupported()) {
                flvPlayer = flvjs.createPlayer({
                    type: 'flv',
                    url: data.flvUrl,
                    isLive: true
                });

                flvPlayer.attachMediaElement(document.getElementById('videoElement'));
                flvPlayer.load();

                document.getElementById('videoElement').play();
            }
        });
    </script>
</body>
</html>
Part 4: Key Implementation Details
Docker Networking on Mac/Windows
On Mac and Windows, Docker containers can’t access localhost to reach the host. Use host.docker.internal:
String rtmpUrl = String.format("rtmp://host.docker.internal:%d/live/%s",
    streamConfig.getRtmpPort(), streamKey);
FFmpeg Optimization for Low Latency
Our FFmpeg command uses these flags for minimal latency:
-
-re: Read input at native framerate -
-preset ultrafast: Fastest encoding -
-tune zerolatency: Optimize for live streaming -
-f flv: Output format for RTMP
Browser Autoplay Policy
Modern browsers restrict autoplay. Handle this gracefully:
videoElement.play().catch(err => {
    console.log('Autoplay blocked, user interaction required');
    updateStatus('Click video to play');
});
Part 5: Testing and Deployment
Running the Application
# Start the Spring Boot application
mvn spring-boot:run
Testing the Stream
- Open http://localhost:8080
- Enter video filename:
test.mp4 - Enter stream key:
mystream - Click “Start Stream”
- Wait 5 seconds
- Click the video to start playback
Monitoring
Check ZLMediaKit logs to verify stream registration:
docker logs zlmediakit --tail 50
You should see:
rtmp://__defaultVhost__/live/mystream
Troubleshooting
Stream Not Playing
Issue: Video player shows black screen
Solution:
- Wait longer (5-10 seconds) for stream initialization
- Click the video element to trigger playback
- Check browser console for errors
FFmpeg Container Fails
Issue: Docker command fails to execute
Solution:
- Verify Docker is running:
docker ps - Check volume mount path is correct
- Ensure video file exists and is readable
404 Error on Stream URL
Issue: Browser gets 404 when accessing FLV URL
Solution:
- Verify ZLMediaKit is running
- Check FFmpeg successfully pushed to RTMP
- Wait longer for stream to register
Performance Considerations
Concurrent Streams
Our implementation supports multiple concurrent streams using ConcurrentHashMap:
private final Map<String, DefaultExecutor> streamProcesses = new ConcurrentHashMap<>();
Each stream runs in its own Docker container, isolated from others.
Resource Usage
-
CPU: FFmpeg transcoding is CPU-intensive. Monitor usage with
docker stats - Memory: Each FFmpeg container uses ~100-200MB
- Network: RTMP uses ~2-5 Mbps per stream depending on quality
Scaling
For production:
- Use a process manager (systemd, supervisor)
- Implement stream limits per user
- Add authentication and authorization
- Use Redis for distributed stream tracking
- Deploy ZLMediaKit cluster for high availability
Benefits:
- ✅ Smaller JAR sizes with modular dependencies
- ✅ Better dependency management
- ✅ Improved performance and startup time
- ✅ Latest security updates and features
Conclusion
We’ve built a complete, modern video streaming service with:
✅ Spring Boot 4.0 - Latest version with modular architecture
✅ Clean Architecture - Separation of concerns with Spring Boot
✅ Docker Integration - No local FFmpeg installation needed
✅ Modern UI - Beautiful interface with flv.js
✅ Low Latency - Optimized for real-time streaming
✅ Production Ready - Error handling and monitoring
Next Steps
Consider these enhancements:
- Add video upload functionality
- Implement user authentication
- Support multiple video formats
- Add stream recording
- Implement adaptive bitrate streaming
- Add WebRTC support for ultra-low latency
- Explore Spring Boot 4.0’s new features
- Implement virtual threads for better concurrency
Source Code
The complete source code is available in the spring-ffmpeg directory with:
- Full implementation with Spring Boot 4.0
- Comprehensive README
- Configuration examples
- Troubleshooting guide
- Runtime demo walkthrough
References
- Github Repo
- Spring Boot 4.0 Documentation
- Spring Boot 4.0 Migration Guide
- Spring Boot 4.0 Modular Design Blog
- ZLMediaKit GitHub
- FFmpeg Documentation
- flv.js GitHub
Author: Built with Spring Boot 4.0, Java 21, and modern web technologies
Date: November 2025
License: Educational purposes
Happy Streaming! 🎥
 Using Claude Code to vibe troubleshooting TLS Secret Naming Issues in Kubernetes with Istio Ambient mode
Click to load Disqus comments